Thursday, June 8, 2017

How to open and play VIDEO_TS files on MacOS Sierra?

For each DVD, there is a folder named VIDEO_TS which contains the DVD's video data and playback information. You may have stored a lot of Video_TS files ripped from DVDs or shared from friends on Mac hard drive, chances are that you want to play the media content in Video_ts folder on MacOS Sierra without DVD player. This guide will tell you how to open and view Video_ts files on MacOS Sierra with two easy methods.


Method 1. Install a Media player for playing Video_ts files

One of the best way to play a VIDEO_TS on MacOS Sierra system is by using a VIDEO_TS player like KMPlayer, VideoLAN (VLC Player), etc.. Here takes VLC as an example, which works essentially the same way as DVD Player. Download this player and follow the below steps to player your VIDEO_TS files.

  • To play a copied/ripped DVD(VIDEO_TS files) from hard disk you can use VideoLAN (VLC Player).
  • Install it. Start VideoLAN (click Start -> Programs -> VideoLAN -> VLC Media Player)
  • Click File -> Open Directory. Find the VIDEO_TS folder, select it and click OK.

Pros: It lets you play video_ts files on MacOS Sierra without conversion.

Cons: Some other formats are still unplayable with a third-party player. Besides, some player apps will slow down your computer. The worst is that some movies would stutter & lag during playback. Or choose an alternative one like 8K Player for Mac. Video_TS files are always high quality videos stored in VOB format. This player supports majority of the audio as well as video formats including playing media contens in VIDEO_TS folder.Method 2. Convert Video_ts to MacOS Sierra friendly formats for playback

Another way to play video_ts on MacOS Sierra is to change video_ts to MacOS Sierra compatible formats like MOV, MP4, M4V. To achieve it, you can use an MacOS Sierra Video_ts converter. Here we highly recommend Dimo Video Converter Ultimate for Mac, an all-in-one package tool for you.

Highlight features:
  • Convert VIDEO_TS to MacOS Sierra video player playable MOV, MP4, M4V
  • 30X quicker speed of conversion
  • Besides converting DVD Video_TS files, it can also convert videos, DVD discBlu-ray discISO files
  • Offer customized profile settings for multiple devices like iPhone, iPad, Android, VR, TV, editors, Samsung, PS3, PS4, Xbox, etc.
  • Quick media file transferring by IP sharing technology and touch up 

If you prefer the way, just follow the below guide on converting Video_ts on MacOS Sierra.

Free Download Dimo Video Converter Ultimate for Mac/Win:


Other Download: 

How to convert Video_ts folder on MacOS Sierra

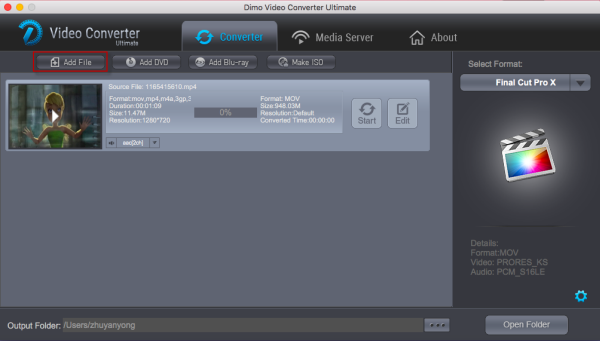
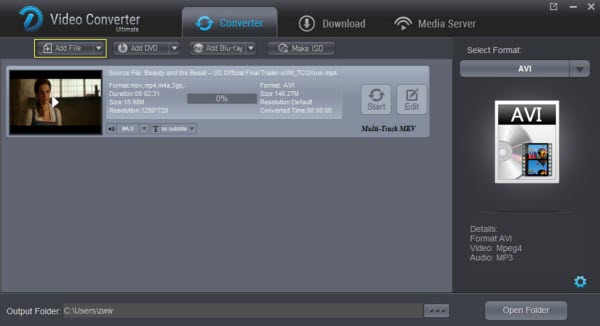
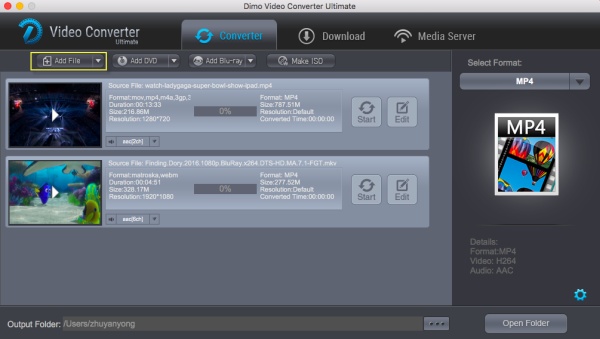
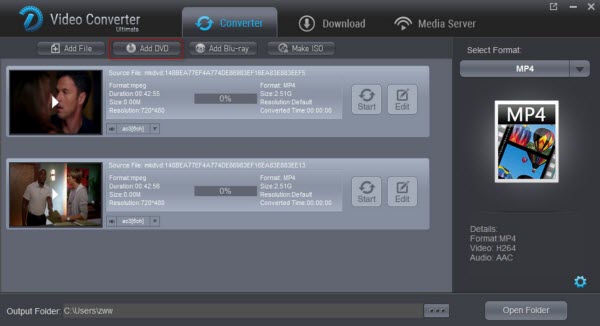
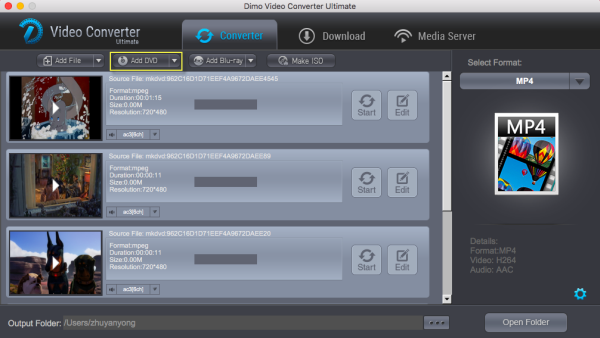
Step 1. Run the VIDEO_TS Converter and click "Add DVD" to import the VIDEO_TS files you want to convert. All added video clips will be shown on the window and you can just double click them to have a review.


Step 2. For playing Video_TS with QuickTime-Mac computer's default video player, just convert VIDEO_TS to MOV or MP4. Go to the "Select Format" window present on right side of the software page. A drop down list will appear with tabs of Format and Device. To simply select the MP4 format, go to Format > Video> MOV or MP4. If you wish to convert the file for a specific device like iPhone, iPad or any other you can go for better choice for output format. Simply go to "Device" and select the one of your choice.

Tip:

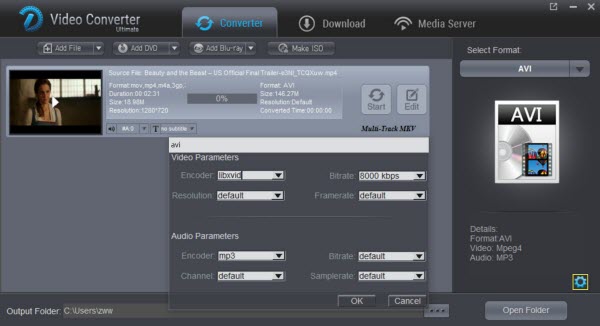
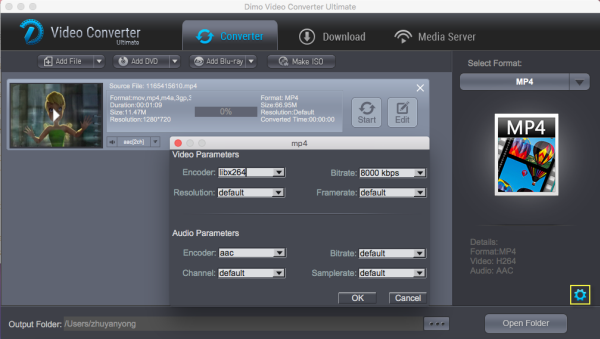
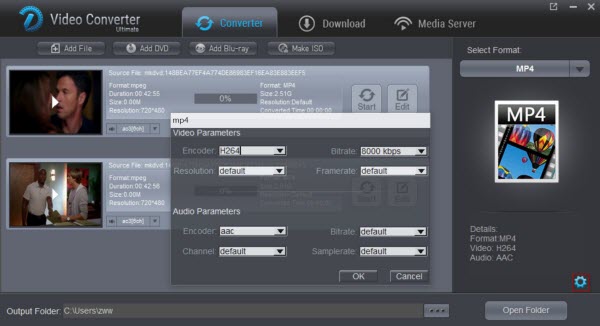
Click the Settings icon to adjust video and audio parameters on the Profile Setting as you need to get the best quality video.


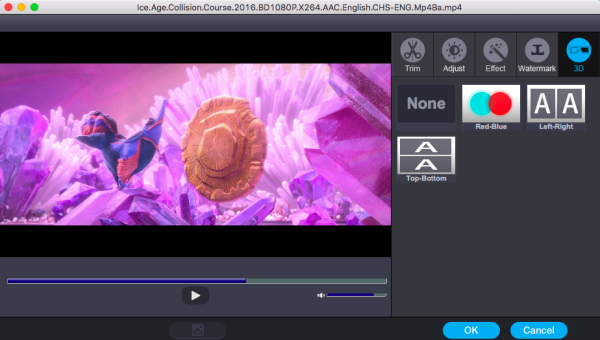
You can edit the videos as you like by clicking on the Edit button. Trimming, cropping, adding watermark, applying special effects function is also provided.

Step 3. Hit the "Start" button to start encoding VIDEO_TS files on MacOS Sierra. After the conversion, you can play your VIDEO_TS files in your native player on MacOS Sierra easily and smoothly. Bingo! That is it. Or share your local video clips on MacOS Sierra to mobile devices or TV for playback.

Pros: It helps you convert any type Video_ts files to MacOS Sierra readable format. You don't need to worry about the incompatible issue any more. Besides, with a video converter app, you can freely tweak the video bitrate, frame rate, resolution to get a decent video that playable on your portable tablets or phones.

Cons: It needs a third-party video converter app and will take some time for video conversion.

Free Download or Purchase Dimo Video Converter Ultimate for Mac/Win:


Need the lifetime version to work on 2-4 Macs so that your friends and family can instantly broaden their entertainment options? Please refer to the family license here


Kindly Note:

The price of Dimo Video Converter Ultimate for Mac is divided into 1 Year Subscription, Lifetime/Family/Business License: $43.95/Year; $45.95/lifetime license; $95.95/family license(2-4 Macs); $189.95/business pack(5-8 Macs). Get your needed one at purchase page.

When we talk about VIDEO_TS files, they are generally a structure a DVD movie that contains information regarding the video. The full form of VIDEO_TS is Video Transport System and the folder mainly contains 3 major files VIDEO_TS.BUP, VIDEO_TS.IFO and VIDEO_TS.VOB.
  • VIDEO_TS.VOB (object files): These files contain the major part of the data present in a DVD including actually video, audio data, subtitles and other information.
  • VIDEO_TS.IFO (information files): These files mainly contain the basic information regarding the DVD and its VOB files. These files thus have data regarding as to what data is to be loaded when DVD is inserted, markers of DVD chapter, DVD commands by user and other.
  • VIDEO_TS.BUP (backup files): These files are the copies of the IFO files and basically work as backup when the original information files gets corrupt and cannot be read.
Thus we can say that VIDEO_TS is basically a folder that contains all the information regarding the videos in a DVD.

Contact us or leave a message at Facebook if you have any issues.

Related Articles:

Thursday, May 25, 2017

Convert Videos with MPEG Streamclip on macOS Sierra

MPEG Streamclip is a well-known video converterplayereditor. As the software applies the QuickTime technology, it's by default that you can upload and play any QuickTime supported file formats as well. However, that might not always be the case. MPEG Streamclip might not work and prompt up messages such as "won't read or open files" or "unrecognized file format". And lots of MPEG Streamclip users have recently discovered it couldn't get the files converted, and the malfunction occurred after they all upgraded to the latest system OS Sierra. For these cases, a great MPEG Streamclip alternative for MacOS Sierra is the best choice for you.


By contrast, Dimo Video Converter Ultimate for Mac is the most outstanding alternative to MPEG Streamclip. The video app is an all-in-one Mac video/audio converter, player, editor and fully compatible with all Mac OS X systems including MacOS Sierra, OS X El Capitan, Yosemite, Mavericks, Mountain Lion, Lion, etc. 

It is more easy-to-use and offers some unbeatable features like lossless mkv output, advanced encoders like ProRes and DNxHD, allowing you to convert video to seamlessly fit Final Cut Pro X/7, Avid Media Composer, Adobe Premiere Pro, etc. and customized output settings for iPhone, iPad, Android, VR, TV and more. 

Plus, it supports more video formats than MPEG Streamclip for Mac like WMV, AVI, AVCHD MTS/M2TS/M2T, MKV, XAVC, XAVC S, MXF, MOV, H.265, etc. That's the reason why it can be seen as MPEG Streamclip for MacOS Sierra alternative and is even much better than MPEG Streamclip. To solve kinds of incompatible issues on Windows PC, Dimo Video Converter Ultimate (Windows 10/8.1 compatible) is right for you - the best MPEG Streamclip equivalent for Windows. 

Free Download Dimo Video Converter Ultimate for Mac/Win:


Other Download: 
How to use the MPEG Streamclip alternative to convert videos on MacOS Sierra

Below, I'll show you how to use this great MPEG Streamclip alternative to rewrap and convert videos on MacOS Sierra in high quality. 

Step 1. Add source video files

Once the software is installed onto your computer, click the "Add File" button to simply import your video files to it. 


Step 2. Choose desired output format

Click "Select Format" bar and move mouse cursor to "Format > Editor" category, here you will find optimal presets for Final Cut Pro, Adobe Premiere Pro, Avid Studio, etc. Besides, almost all common videos like MP4, MOV, MKV, FLV, WMV, AVI, etc. are also provided.


Step 3. Start transcoding

Once you are ready, simply click on the "Start" button to convert your video files to the preferred output format on MacOS Sierra without least quality loss. And you can get the resulted files easily via clicking the Open button. Now start transferring your converted files for editing, playing and sharing.

Free Download or Purchase Dimo Video Converter Ultimate for Mac/Win:


Need the lifetime version to work on 2-4 Macs so that your friends and family can instantly broaden their entertainment options? Please refer to the family license here


Kindly Note:

The price of Dimo Video Converter Ultimate for Mac is divided into 1 Year Subscription, Lifetime/Family/Business License: $43.95/Year; $45.95/lifetime license; $95.95/family license(2-4 Macs); $189.95/business pack(5-8 Macs). Get your needed one at purchase page.

Related Software:

BDmate (Mac/Win)

Lossless backup Blu-ray to MKV with all audio and subtitle tracks; Rip Blu-ray to multi-track MP4; Convert Blu-ray to almost all popular video/audio formats and devices; Copy Blu-ray to ISO/M2TS; Share digitized Blu-ray wirelessly.

DVDmate (Mac/Win)

A professional DVD ripping and editing tool with strong ability to remove DVD protection, transcode DVD to any video and audio format, and edit DVD to create personal movie.

Videomate (Mac/Win)

An all-around video converter software program that enables you to convert various video and audio files to formats that are supported by most multimedia devices.

8K Player (Mac/Win)

A mixture of free HD/4K video player, music player, Blu-ray/DVD player, video recorder and gif maker. 
Contact us or leave a message at Facebook if you have any issues.

Related Articles:

Monday, May 22, 2017

WLMP to AVI converter: How to convert WLMP to AVI

WLMP, short for Windows Live Movie Maker (the successor Windows Movie Maker), is a project file usually created from movies, video clips, slides, photos, audio, or music and contains movie transitions, music, effects, etc. as well as links to digital photos or videos. It is very useful for video editing. But you should know it is not a valid video file like WMV, AVI for WMP, so you cannot play it directly in Windows Media Player or upload it to Youtube or Facebook, etc. If so, It's impossible for you to export videos from Windows Live Movie Maker to AVI too. No worry here, there is a workaround in this article if you insist to save your WLMP as AVI files.


What's the most effective tool to convert WLMP to AVI Videos?

To play WLMP files you make at anytime anywhere and share them with your friends at your fingertips, Dimo Video Converter Ultimate is highly recommended to accomplish WLMP to AVI conversion. It has excellent quality and can finish the conversion at fast speed. With it, you can fast convert WMV (WLMP) files from/to AVI, MOV, WMV, FLV, 3GP etc. almost all regular formats. The equivalent converter for Mac is Dimo Video Converter Ultimate for Mac, which allows you to change WMV (WLMP) to MOV, M4V, etc. on Mac (OS Sierra and Yosemite included). Now just download the right version and follow the steps below to finish the conversion.

Free Download Dimo Video Converter Ultimate (Win/Mac):


Other Download: 

Tutorial on how to convert Windows Live Movie Maker Files (WLMP) to AVI or other formats

Step 1 Export WLMP files to WMV/MP4

Please launch Windows Live Movie Maker to save Windows Movie Maker project files to WMV video, by the path from the "Start" menu and go to "File" > "Open Project" to open your WLMP file. Then head to "File" > "Save Movie" category to choose "WMV" or "MPEG-4/H.264 (MP4)" as the output format, WMV is highly recommended here. Because this video converter can only recognize a video file other than a project file.

Step 2 Import WMV files to WLMP converter

After downloaded and installed Dimo WLMP to AVI converter, just input the WMV File to the program by clicking "Add Files". You can also directly drag the video files to the program for conversion.


Step 3 Choose AVI as Output Format

Click the "Select Format" option at the right to bring up the format selection window. Just choose "AVI" from the "Video" or "AVI HD" from the "HD AVI" ( assumed your WLMP is HD file). If you want to change the codec, resolution, frame rate and other video settings, you can click the "Settings" option at the bottom right corner.


Note: The WLMP converter supports a wide range of video formats including MP4, MPG, MOV, MKV, FLV, MTS, 3GP, ASF, etc 200+ media formats and devices.

Step 4 Start the WLMP to AVI Conversion with 60X faster conversion speed than ever

When all the settings are done, click the "Start" button to start AVI conversion. Depending on your video size, computer performance, output settings, etc., the task will be accomplished in the shortest time.

In addition, the app has some helpful edit functions such as to crop, trim, add video effects to the videos etc. to make your files more enjoyable. Detailed information about this is in the Guide of Video Converter.

Optional: Transcode WLMP to AVI by using Dimo Video Converter Ultimate

If you are looking for a more powerful WLMP converter to do more things besides AVI, for example, ripping any Blu-ray/DVD Folder/ISO file including copyright protection with CSS, region code, RCE, Sony ArccOS, UOPs, Disney X-project DRM and the latest encryption techniques, then the all-in-one Dimo Video Converter Ultimate must be your need. It can not only change WLMP to AVI, but also WLMP to AVI, WLMP to MKV, WLMP to MOV ect. any video and audio formats with faster conversion speed than many likewise video converters. 

With built-in advanced editor, you can crop video, trim video, add effects/watermark to enhance video without any troubles. In addition, the wirelessly media server function to share any WLMP files from your computer to home entertainment devices only by "ONE-CLICK".

Free Download or Purchase Dimo Video Converter Ultimate for Mac/Win:


Need the lifetime version to work on 2-4 Macs so that your friends and family can instantly broaden their entertainment options? Please refer to the family license here


Kindly Note:

The price of Dimo Video Converter Ultimate for Mac is divided into 1 Year Subscription, Lifetime/Family/Business License: $43.95/Year; $45.95/lifetime license; $95.95/family license(2-4 Macs); $189.95/business pack(5-8 Macs). Get your needed one at purchase page.

Related Software:

BDmate (Win/Mac)

Lossless backup Blu-ray to MKV with all audio and subtitle tracks; Rip Blu-ray to multi-track MP4; ConvertBlu-ray to almost all popular video/audio formats and devices; Copy Blu-ray to ISO/M2TS; Share digitized Blu-ray wirelessly.

DVDmate (Win/Mac)

A professional DVD ripping and editing tool with strong ability to remove DVD protection, transcode DVD to any video and audio format, and edit DVD to create personal movie.

Videomate (Win/Mac)

An all-around video converter software program that enables you to convert various video and audio files to formats that are supported by most multimedia devices.

8K Player (Win/Mac)

A mixture of free HD/4K video player, music player, Blu-ray/DVD player, video recorder and gif maker. 

Contact us or leave a message at Facebook if you have any trouble to convert WLMP/WMV to AVI video with Windows or Mac.

Related Articles:

Friday, May 12, 2017

How to Rip DVD to SBS MP4 on Mac/Windows

As the popularity of 3D movies nowadays, more and more people would like to go the cinema to enjoy the 3D movie with great visual enjoyment or see classical films with advanced 3D effect. Chances are you have a bunch of DVD collections, ever dreamed of creating 3D movies by yourself and enjoy on 3D TV, glasses-free 3D smartphones, or other compatible 3D display device? Here this article will shows you how to convert DVD movies into 3D SBS MP4 without any hassles so that you can enjoy 3D movies at home instead of going to cinema or storing with keeping 3D effects.


SBS 3D, short for side-by-side 3D, is the best solution which has been a widely used 3D format besides frame-sequential 3D when airing 3D contents over cable onto 3D TV. To rip DVD to 3D SBS MP4 videos, you need a professional DVD ripper to achieve our goal.

Here Dimo Video Converter Ultimate for Mac has the full capacity to rip or convert all the DVD, 2D/3D Blu-ray and 2D/3D movies in MTSMKVFLV, etc. to Side-by-Side 3D videos in a bevy of formats, including not only MP4, but also MKV, AVI, WMV, MOV on Mac. What's more, the creating SBS 3D videos could be left/right or top/bottom videos. 

Furthermore, the built-in video editor allows you to easily get desired video part and effects. If you're using a Windows PC, please turn to Dimo Video Converter Ultimate, which enables you to convert DVD to 3D SBS MP4 videos on Windows PC (including Windows 10). Now download the right version and check out the guide below.

Free Download Dimo Video Converter Ultimate for Mac/Win:


Other Download: 

How to rip DVD to SBS 3D MP4 format with ease

Step 1. Import DVD movie

Launch the professional DVD converter. Click "Add DVD" button to add DVD movie to it. Double click the video, you can preview the movie by double clicking. From audio track option, you can select your desired audio track for output. And by clicking Edit, you can trim, crop videos, adjust video effects, add watermarks, etc.


Step 2. Choose output format

Tap on "Select Format" bar and find "Format > Video", there are a lot of format options for you. "MP4" is what you need here.


Step 3. Add 3D Effect

Click "Edit" and turn to 3D, then choose "Left-Right" and click "OK" to set 3D mode for viewing 3D movies with SBS 3D effect. 


Step 4. Start ripping your DVD movies

Simply click the "Start" button under the preview window, and the DVD ripper will start the conversion from DVD movies to SBS MP4. After conversion, open output file destination, locate the created SBS 3D MP4 video and you could watch it on your 3D player, PC or VR hedsets as you want with a pair of assorted glasses.

About Side-by-Side 3D (SBS 3D)

SBS 3D, short for side-by-side 3D, is a widely used 3D format besides frame-sequential 3D. Side-by-Side 3D video consists of two halves on the left and right, with the entire frame for the left eye scaled down horizontally to fit the left-half of the frame, and the entire frame for the right eye scaled down horizontally to fit the right side of the frame. 

Thus, in the case of 720p content (resolution of 1280 x 720), each frame will actually consist of the horizontally scaled frame for the left eye with a resolution of 640 x 720 and adjacent to it, the corresponding frame for the right eye at the same 640×720 resolution. When playing a Side-by-Side 3D video, a 3D PC or 3D TV will play the file with different 3D display technologies, mainly active shutter or polarization. That depends on your 3D hardware.

Advantage and Disadvantage of SBS 3D

It's clearly that the disadvantage of SBS 3D is the halving of the horizontal resolution of the image. And the quality of SBS 3D won't be as good as sequential 3D content. But this is not pretty much noticeable and won't affect 3D enjoying very much. Why SBS 3D is popular despite a downgrading of the output quality? For the advantages overweigh the disadvantage. First, SBS 3D uses the same bandwidth as regular HD content, so it can be transmitted in the same way that current HD signals are transmitted. It is suitable for cable or air television, and also can be used in most of TVs (and some projectors). As a result, you won't need an expensive set-top-box replacement for viewing 3D content. Besides this, SBS 3D is a nice way for you to copy and backup your 3D BD. With SBS 3D output, your backup disc can be decreased to a half size (or even smaller) of the source 3D to save you money.

Free Download or Purchase Dimo Video Converter Ultimate for Mac/Win:


Need the lifetime version to work on 2-4 Macs so that your friends and family can instantly broaden their entertainment options? Please refer to the family license here


Kindly Note:

The price of Dimo Video Converter Ultimate for Mac is divided into 1 Year Subscription, Lifetime/Family/Business License: $43.95/Year; $45.95/lifetime license; $95.95/family license(2-4 Macs); $189.95/business pack(5-8 Macs). Get your needed one at purchase page.

Related Software:

BDmate (Mac/Win)

Lossless backup Blu-ray to MKV with all audio and subtitle tracks; Rip Blu-ray to multi-track MP4; Convert Blu-ray to almost all popular video/audio formats and devices; Copy Blu-ray to ISO/M2TS; Share digitized Blu-ray wirelessly.

DVDmate (Mac/Win)

A professional DVD ripping and editing tool with strong ability to remove DVD protection, transcode DVD to any video and audio format, and edit DVD to create personal movie.

Videomate (Mac/Win)

An all-around video converter software program that enables you to convert various video and audio files to formats that are supported by most multimedia devices.

8K Player (Mac/Win)

A mixture of free HD/4K video player, music player, Blu-ray/DVD player, video recorder and gif maker. 

Contact us or leave a message at Facebook if you have any issues.

Related Articles:

Monday, May 8, 2017

Get DVD movies into Plex for playback with Ease

As a media server application, Plex enables us to share music, movies on TV, PS3, PS4, Xbox 360, Android, iOS, and other DLNA-certified devices locally via home network connection, or remotely, as long as you have a Internet connection. To make the whold process of putting DVD into Plex for streaming and sharing to create a wireless home entertainment setup, you'll need to convert DVD to Plex compatible file formats first. For this purpose, this article will show you the way to rip and copy DVD discs for streaming over Plex Media Server for watching on TV, Android, iOS, etc. even without downloading a DVD player.


To rip DVD to Plex media server, many people is used to using HandBrake. However, the tendency becomes changed. On one side, HandBrake does not support copy protected and especially the latest DVDs natively; on the other side, it has more and more issues now such as not encoding fully. To copy all kinds of DVDs to Plex server more smoothly and easily, you are suggested to turn to a professional DVD to Plex ripper for MacBook, iMac, Mac Pro on Mac OS Sierra, OS X El Capitan, Yosemite, etc. - Dimo Video Converter Ultimate for Mac.

With it, you can easily convert the commercial DVD movies to Plex compatible video files with high quality and fast speed. It aims to solve this problem by giving us the ability to store our purchased physical DVD, Blu-ray discs or video files to local computer, hard drive then stream over a home network for Plex Media Server and Samsung Galaxy, Surface, iPad, iPhone, iPod Touch, etc. playback. It's professional in ripping and converting Blu-ray/DVD discs, Blu-ray/DVD ISO image, Blu-ray/DVD copies, SD/HD/4K videos and more.

The equivalent Windows version is Dimo Video Converter Ultimate which can rip and convert DVD movies to Plex Media Sever on Windows 10, Windows 7/8.1/XP/Vista. Just get the right version according to your computer's operating system and follow the steps below to copy DVD movies to Plex Media Sever for streaming with ease.

Disclaimer: Digiarty Software does not advocate ripping copy-protected DVDs for any commercial purpose and suggests referring to the DVD copyright laws in your countries before doing so.

Free Download Dimo Video Converter Ultimate (Win/Mac):


Other Download: 

How to Backup and Rip DVD to Plex Media Sever

1. Add DVD movies

Install and launch DVD Ripper for Plex program, and then click "Add DVD" icon to import your source movies to this program. Set your wanted audio track from the drop-down box of "Audio" tab.


2. Select an output format

Click the "Select Format" option, and choose MP4, SD/HD/4K MKV, etc. from "Format > Video", "Format > HD Video", "Format > 4K Video" as output format. 

Situation 1. If you want to preserve everything on a DVD, the best output format should be MPEG. 

MPEG/MPEG2 file converted from a DVD also contains the full information of the original, but the output file will be much smaller than others. One more thing.mpg file is generally friendly with TVs.

Situation 2. If you are not overly concerned about file size, and would prefer the best-quality MKV container for output.

Choose "Lossless MKV" from "Format > Multi-track". It is the standard of HD video in DVD or 1080p quality, and would preserve any multichannel audio (i.e. 5.1 surround sound). The file size may range from 4GB to 7GB. It would be widely accepted by kinds of media servers like Plex, NAS, Xbox, etc.. The audio codec ned to go to AAC, AC3 and DTS.

Situation 3. If you want to seek a good balance between quality and size, and MP4 (MPEG-4 Part 14) would always be the answer.

MPEG-4 video is the most universal format that is the best choice for playing or streaming movies onto Apple, Android, Microsoft and Sony devices like HDTVs, iPhone, Apple TV, Mac, Samsung smartphone, Xbox, PS3 and PSP. Barely any player and gadget does not support MP4. Besides, it has a better video compression, so it can deliver a good quality outcome in small file size comparatively.  >> See How to Rip DVD to MP4

Tip: If you like, you can click "Settings" to change the video encoder, resolution, frame rate, etc. as you wish. Keep in mind the file size and video quality is based more on bitrate than resolution which means bitrate higher results in big file size, and lower visible quality loss, and vice versa.


3. Start ripping DVD for Plex Media Sever

Click the "Start" button under the preview window, and the DVD ripper will start the conversion from DVD movies to MKV or MP4 for Plex Media Sever. After conversion, you can stream DVD movies through Plex Media Server to HDTV or iPad, iPhone, Android, or other DLNA-compliant devices.

How to Stream or Store DVD Movies with Plex or Roku Media Server?

If you are to use/are using Plex:

Step 1. To transfer DVD/DVD movies to Plex, first download, install and launch Plex app.
Step 2. Create a Plex account.
Step 3. Add library by clicking "Add Section" button and selecting "Movies".


Step 4. Select the DVD rips you want to add and click the Add Folder button.
Step 5. Tune into Plex and by use of DLNA-friendly device (like DLNA-receptive set-top box, gaming console, a Chomecast) to stream the movies to different devices. Thus, you can create a digital library for use around my home by my family.

Free Download or Purchase Dimo Video Converter Ultimate:


Need the lifetime version to work on 2-4 PCs so that your friends and family can instantly broaden their entertainment options? Please refer to the family license here


Kindly Note:

The price of Dimo Video Converter Ultimate for Windows is divided into 1 Year Subscription, Lifetime/Family/Business License: $43.95/Year; $45.95/lifetime license; $95.95/family license(2-4 PCs); $189.95/business pack(5-8 PCs). Get your needed one at purchase page.

Related Software:

BDmate (Win/Mac)

Lossless backup Blu-ray to MKV with all audio and subtitle tracks; Rip Blu-ray to multi-track MP4; ConvertBlu-ray to almost all popular video/audio formats and devices; Copy Blu-ray to ISO/M2TS; Share digitized Blu-ray wirelessly.

DVDmate (Win/Mac)

A professional DVD ripping and editing tool with strong ability to remove DVD protection, transcode DVD to any video and audio format, and edit DVD to create personal movie.

Videomate (Win/Mac)

An all-around video converter software program that enables you to convert various video and audio files to formats that are supported by most multimedia devices.

8K Player (Win/Mac)

A mixture of free HD/4K video player, music player, Blu-ray/DVD player, video recorder and gif maker. 

Contact us or leave a message at Facebook if you have any issues.

Related Articles: